Custom Search

Saturday, February 28, 2009

How to setup/put/install Google Adsense for Search

Sponsored Links


What is Adsense for Search?

AdSense for search is a free solution that allows publishers to place a search box on their site and earn revenue from relevant ads on the search results page.

AdSense for search offers you the following:

  • choosing the content your users search: your site, a collection of sites you choose, or the entire web. You can also prioritize and restrict search to specific sections of sites.
  • customization of look and feel - you choose the colors, location of the ads, and the option to host the results on your site or have Google host them for you.
  • monetization of search results pages with targeted ads.
- Google Adsense

This is a step by step tutorial on how to setup/put/install Google Adsense for Search.

1. Login to your Google Adsense Account.

2. Click on Adsense Setup tab.

3. Click on Adsense for Search.

4. In the Search Type field, you have the option to select either Only sites I select or The entire web. It would be best that you choose Only sites I select considering that you don't want your visitors to leave your site.

5. In the Selected sites field, enter your blog or web URL, in my case I entered http://bloggertinker.blogspot.com

6. In the Optional Keywords, type the keywords that you want to use to tune your search engine result.
Example:
If your topic is about blogging tips, you enter the keywords: blogging, blog, blog tips, blog tutorials, adsense. Separate you keywords with a comma "," .

7. In the Site language field, select the primary language of your website.

8. In the Your site encoding field, I just leave the default value, which is West European Latin-1 (ISO-8859-1)

9. In the Country or territory for Google domain field, I just leave it as United States.

10. In the Custom channel field, I would suggest that you check Automatically create a new channel, if you have no idea what Channels are. I will make a detailed explanation on this in my future post but if you are curios about Channels consult Google's Channel Guide here.

11. Click Continue>>.

12. In this page, select the Look and Feel and the Text Box Length of your Search Box. See the Sample on this page so that you will know how your Search Box would look.

13. Click Continue>>.

14. In the Opening of search results page field, I suggest that you select Open results on Google in a new window. This way you don't have to worry about your layout getting messed up because of the search results. But of course it is up to you if you want to choose other options.
You also have the option to put a Logo on you search result window by providing the image URL in the Logo image URL field.

15. Click Continue>>.

16. Check the "Your use of these AdSense for Search features is subject to additional terms..."

17. Name Your Search Engine if you want to, in my case I named it BloggerTinker Search. Try using my Search and you will see my search engine name at the top.

18. Click on Submit and Get Code. Copy the code.

19. Login to you Blogger account.

20. Click on Layout.

21. Adding the Adsense Search is just like adding your favorite widgets. Click on Add a Gadget and select HTML/JavaScript. Paste the Adsense for Search code and click on Save. Positon your Adsense Search on the location that you want.22. View your blog.

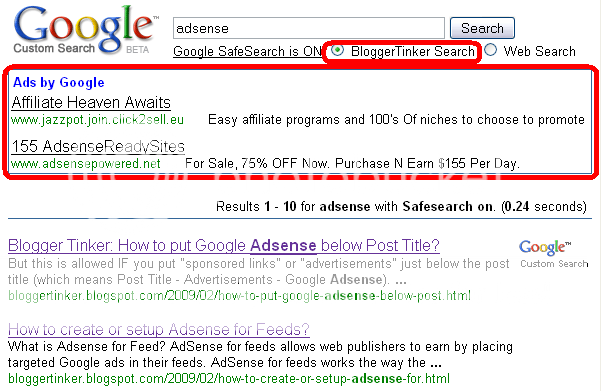
The tutorial is a bit long right? Well, step by step tutorial is better than a tutorial that only talks on the most important parts. This way, beginners will also be guided in the correct direction. Test Your Adsense Search on you should see ads on your search result window, something like the below the title of these post or click HERE for a search test on this site.

Tuesday, February 24, 2009

How to fix bx-XXXX Error when uploading a blogger template

Sponsored Links

I am quite sure some of you have experienced the bx error when you try to upload a new blogger template. I have encountered this problem with my other blog and have found a way on how to fix this. When someone ask me on how to fix this, my reply is always to clear their offline data, cache and cookies. Unfortunately this fix will not work on most users. A specific example of this problem where many users were complaining and the number of comments reached to 788 (and couting) is the Ads Theme Template by EblogTemplates which I also used on my other blog.

Sample of these BX error codes are:
  • bx-bliced
  • bX-ev85ll
  • bX-39cc9q
  • bX-y6cz0v
  • bX-982020
Fortunately just today, I have found a fix from BloggerBuster (Thank you very much Amanda!) and here are the steps:
  1. First of all, try to upload your new template in the Layout>Edit HTML section of your dashboard. Not all templates have been affected by this issue, so it is advisable to check before attempting to edit your template significantly. If you do receive a bX-error code when trying to upload your template, you should proceed to step 2.
  2. If your new template is an XML file (with the .xml entension), browse to where this is located on your computer and right click the file. Choose to open with Notepad (or your favorite basic text editor). If your template is contained within a text file (for you to copy and paste into the template editor), simply open this with your text editor.
  3. Search for every instance of b:widget id= in your template, for example:

    • b:widget id='Header1'
    • b:widget id='Blog1'
    • b:widget id='Label1'
    • b:widget id='HTML1'

    Replace each of these IDs with the next number up. For example, Header1 should become Header2; Blog1 should become Blog2, HTML3 should become HTML4 and so on.
  4. Once you have changed each and every instance of widget id to a different number, you should save the template under a slightly different file name (to be aware of your altered file). If this is an XML file, be sure to save with the XML extension.
  5. Now you have made these changes, attempt to upload your file again in the Layout>Edit HTML section of your Blogger dashboard. Now you should not receive the error code and will be able to upload your template.
Amanda said, "If after following these steps you are still unable to upload your revised template, it is worthwhile to close your browser and delete all temporary internet files and cookies. Then restart your browser and try to upload again. Clearing all of these temporary files from your browser will ensure you receive a fresh page when editing your template. Previously when I have received error codes while editing Blogger templates, this technique has resolved the issue."

The reason why the bx-XXXX error occurs when you upload a template is because the Blogger developers
changed the way template editor accepts certain third party code. They have seen a lot of data corruption due to 'bad templates'.

Click here if you want to read the original post from Amanda of BloggerBuster.


Monday, February 23, 2009

How to make rounded corners without images (one line code)

Sponsored Links

There are many ways to make rounded corners. Most of them uses Javascript and CSS codes. And I believe most websites use images to make rounded corners. But I prefer rounder corners without using images simply because I don't have to worry about images. There are several tutorials I have found in the Internet on how to make rounded corners without images. But the problems are: it has bugs, the code is too long (messy) for just making rounded corners or it will not work on other browsers.

I stumbled across this forum, tested the code and it worked perfectly! But the code is very confusing! All you have to do is add one line of code in your wrappers! This is by far the simplest, easiest and coolest way to get rounded corners on your containers of almost any size or dimension (radius) without using a single image. The guys at Mozilla have provided us support for this CSS standard. The code is actually simple. Just define the amount of radius you want for a given corner of a container's style declaration.

This is a step by step tutorial on how to make rounded corners without images with using only one line of code.

1. Login to your Blogger account.

2. Backup you Template.

3. Lets say we make our header with rounded corners. So locate the code below:

#header

If you want to make your sidebar and main wrappers with rounded corners just locate the codes below:

#main-wrapper {

AND

#sidebar-wrapper {

4. Between the { and } (open and close brackets), put the code below:

-moz-border-radius: 15px 15px 15px 15px;

The parameters are upper-left, upper-right, lower-right and lower-left CORNERS.

5. View your blog and it should look something like the screen shot above.

This is by far the neatest code to make rounded corners. Only one line of code! But the big problem with this is browser compatibility issue. Opera, Internet Explorer (IE), and Google Chrome just ignore the code and renders normal square corners. This will only work with Firefox and Safari. Lets just hope that Opera, Internet Explorer (IE), Google Chrome and other browsers could catch up on this.

Friday, February 20, 2009

How to change the font face/type/family of Google Adsense Text Ads

Sponsored Links

Today, I have just received an email from Inside Adsense that we can now control or change the font type or style of our Text Ads. We can choose between Arial, Times, and Verdana font faces. The options are limited but this is much better than no control over it.

This is a step by step tutorial on how to change the font face/type/family of Google Adsense Text Ads.

1. Login to your Google Adsense account

2. Click on the Adsense Setup Tab

3. Click on Manage Ads

4. Choose an Ad unit that you would like to customize

5. Scroll down and now you will see a new "Fonts" option. Select the Font Family that you want. There are only 3 choices: Arial, Times and Verdana. As I have said, this is much better than no control, right?
6. Click on Save settings. "Your AdSense unit has been saved. Changes may not appear for up to 10 minutes." Done!

I have just noticed that the options Account default, Standard Adsense font family and Verdana are of the same values. This means that the default font face for Google adsense before this new feature is Verdana. So to those blogs or sites who used Verdana as their font, I guess you don't need to change your Text Ads font. But of course its up to you.hehe Note that this feature is not applicable to LINK UNITS.

You can set a custom font as the account default, to show in all your AdSense for content units. You can also choose custom settings on individual ad units. We currently offer the font faces Arial, Times, and Verdana, which have shown to perform well across publisher sites. - Google

I have not tried this one yet since I am using different templates on my different blogs. The customization or changing of the font really depends on what font you used in your text so that you can better blend the ads and your text. So to those who participated in the Google Adsense program, I encourage you to try this. This might just be a little thing to you but I believe most Adsense users, who wants to better optimize their Google Text Ads, are happy with this new feature.

Wednesday, February 18, 2009

How to put Icons or Images on every blogger widget

Sponsored Links

This is a step by step tutorial on how to put Icons or Images on every blogger widget. To better understand what I am saying, please see screen shot below. 1. Login to your Blogger account.

2. Backup you Template.

3. Locate the code below:

.main .Blog {
border-bottom-width: 0;
}

If you can't locate the code above, then probably you are using a customized template. In this tutorial I just played with Blogger's Minima template.

4. After the code above, copy and paste the code below:

.sidebar .widget h2 {
background: yellow url('http://i426.photobucket.com/albums/pp341/PinoyINGermany/twitter.png') no-repeat left top;
margin-top:5px;

text-indent: 20px;
padding:7px;

}

5. Click SAVE TEMPLATE and view your blog.

I just used a StumbleUpon image to make this tutorial easier to understand. I also added a Yellow background so that you can distinguish on where the icon or image is positioned. The left value in the code puts the icon on the left side of the blogger widget. I encourage you to experiment, change the image by just replacing the background url and try changing the values of the code. If you have questions, please don't hesitate to ask and I will help you with all my powers.hehe

Monday, February 16, 2009

How to create or setup Adsense for Feeds

Sponsored Links

What is Adsense for Feed? AdSense for feeds allows web publishers to earn by placing targeted Google ads in their feeds. AdSense for feeds works the way the rest of the AdSense program works: by delivering ads that are relevant to your content and your readers.

Like other AdSense ads, feed ads can be paid in two ways: by click, or by impression. Feed ads can also be targeted in two ways.

  • contextually targeted to the content in your feed
  • targeted by advertisers to your specific feed when you set up an ad placement

You can control the frequency, appearance, and positioning of Google ads in your feeds. The ad size is automatically determined based on where your feed is appearing. - Google Adsense

Step by step tutorial on how to create or setup Adsense for Feeds.

1. Login to your Google Adsense account.

2. Click on Adsense Setup Tab.

3. Click on Adsense for Feeds.

4. In this step, you have the option to change the setting of your Adsense for Feed unit. But I usually leave its default settings because I don't have any problems with it.

If you are using FeedBurner to burn your feeds, your blog will be displayed below. In this example, it stated that "Your only remaining feed without an ad unit, , will display this ad unit."

5. Click on Save and you are done!

6. The next time you publish an article, your Feed Subscribers will see a Google Ad below your post. Below is a sample screen shot of my Tech Blog feed, TechMata, with Google Adsense for Feed. My Asus Eee PC 1000 Review to be specific.


Please note that you can also consult the official Google Adsense page regarding this tutorial.


How to add FeedFlare below your Blog Post

Sponsored Links

What is FeedFlare?
FeedFlare
gives your subscribers easy ways to email, tag, share, and act on the content you publish by including as many or few of the services such as Email This, Comments Count, Subscribe to this Feed, Digg, Facebook, StumbleUpon and many more. FeedFlare places a simple footer at the bottom of each content item, helping you to distribute, inform and create a community around your content.

Step by step tutorial on How to add/insert/embed FeedFlare below your Blog Post.

1. Login to your Feedburner account.
2. Click on the Feed Title.
3. Click on Optimize Tab.
4. Click on FeedFlare.
5. Check on the services you want to display in your Feed or on your Site.
6. Note that there is a FeedFlare Preview/Ordering below the list of services. This lets you see how FeedFlare will appear in your feed and/or on your site. Just Click and Drag the links on the location that you want.
7. Click on Save.
8. Before the Save button, there is a "Get the HTML code to put FeedFlare on your site". Choose the Blogging Platform that you use (I used Blogger).
9. A pop-up window will appear and it contains the instructions on how you embed the FeedFlare on your blog. Just follow the instructions.
10. View your blog.
11. Note that it will often take 5-30 minutes for FeedFlare links to show up below new posts on the site, but delays of ~24 hours should not occur (FeedBurner Support).

Visit my Tech Blog and you will see a Live Sample about this tutorial. It will look like the image below.
"Important Note:
If you use our FeedFlare service in your feed (and especially, on your website or blog), you should know that FeedFlare links won't appear below your content unless your feed is polled at least once after a new post by a web browser, news reader, or other feed aggregator. Feeds that don't yet have a lot of subscribers are most susceptible to going minutes, or even hours, without FeedFlare appearing.

The remedy? Visit your FeedBurner feed in a browser after you've updated your site with a new posting. Visiting your feed forces FeedBurner to poll for updates if no one has visited it in a while, and this polling action should lead to creation of FeedFlare links shortly thereafter.
" - FeedBurner Support.

Wednesday, February 11, 2009

How to put Google Ads below Post Content but above Comments

Sponsored Links

Step by step instruction on how to put below Post Content but above Comments.

1. Login to your Blogger account.

2. Backup you Template.

3. Check the Expand Widget Templates checkbox.

4. Locate the code below:
<div class='post-footer-line post-footer-line-3'> <span class='post-location'> <b:if cond='data:top.showLocation'> <b:if cond='data:post.location'> <data:postLocationLabel/>

5. Just before this code paste your Google Adsense code. (Parse your Adsense code first before you paste it as your are pasting it directly on your XML code not within a HTML/JavaScript widget. You can parse your Google Adsense code here.)

Example of a Parsed Google Adsense Code:
<!-- Start Code Google Ads-->
<br/>
&lt;script type=&quot;text/javascript&quot;&gt;&lt;!-- google_ad_client = &quot;pub-7052701651002780&quot;; google_ad_host = &quot;pub-1599271086004685&quot;; /* BT BelowComments 336x280 TextAd */ google_ad_slot = &quot;9693535680&quot;; google_ad_width = 336; google_ad_height = 280; //--&gt; &lt;/script&gt; &lt;script src=&quot;http://pagead2.googlesyndication.com/pagead/show_ads.js&quot; type=&quot;text/javascript&quot;&gt; &lt;/script&gt;
<!-- End Code Google Ads-->

I would suggest that you put a comment like the one above so that it will be easier for you to debug later if you want to make changes. The code that you will put here should be parsed.

6. Click SAVE TEMPLATE and view your blog.

Monday, February 9, 2009

How to put or install StumbleUpon button or link in every Post on your Blog

Sponsored Links

Step by step tutorial on how to put or install StumbleUpon button or link in every Post on your Blog.

1. Login to your Blogger account.

2. Backup you Template.

3. Check the Expand Widget Templates checkbox.

4. Locate the code <data:post.body/>. Just before this code, Copy and Paste the code below.
<a class='timestamp-link' expr:href='"http://www.stumbleupon.com/submit?url=" + data:post.url + "&amp;title=" + data:post.title' title='permanent link'><img style="padding: 0; border: none;" src="http://cdn.stumble-upon.com/images/32x32_su_round.gif" alt="Stumble Upon Toolbar" align=""/></a>

5. Click SAVE TEMPLATE and View your blog.

Friday, February 6, 2009

How to use and setup Feedburner (Email Subscription) for your blog

Sponsored Links

Feedburner allows you to publicize your blog. It allows you to optimize distribution so that your content or article is correctly formatted for all of the major directories and can be consumed by subscribers wherever they are. It allows you to analyze your web traffic. Best of all, since Feedburner was already acquired by Google, you can monetize your feed with Google Adsense for Feeds.

Step by step tutorial on how to use and setup Feedburner (Email Subscription) for your blog.

1. Sign up for Feedburner.

2. Paste your blog URL and click Next.

3. Select YOURBLOGNAME - Atom: http://YOURBLOGSUBDOMAIN.blogspot.com/feeds/posts/default. Leave the default selection as it is which is Atom feed.

4. Click Next.

5. Again in this step just leave the default values as it is (but you can change it if you want to).

6. Congrats! Your FeedBurner feed is now live (They should have changed this message as it is misleading to the users, it says live but actually you have to wait for a couple of hours). Click Next.
7. Choose the information which you want to track. In the screenshot below I choose Clickthroughs — How often people click items back to your site and I want more! Have FeedBurner Stats also track. Click Next. You're Done setting up your Feedburner

8. Click on My Feeds.

9. Click on the Feed Title which you have just created. It will prompt a message "Your feed is so new, we’re still playing with the bubble wrap. Check back soon for a full dose of stats." Just wait for a couple of hours and your feed will be up and running.

10. Assuming that your feed is already up and running. Click on your new Feed.

11. Click on Optimize Tab and Activate BrowserFriendly and SmartFeed (actually its up to you on which services you want to activate. I only use these 2 services because these are all I need and understand.hehe)

12. Go to Publicize Tab and activate Email Subscriptions.

13. Go to Use as a widget in and choose Blogger (if you are using Blogger).

14. Click Go Select the blog you want and type the title that you want.

15. Click ADD A WIDGET.

16. The next page would be the Page Elements. Just find the Email Subscription widget you have just created and drag it wherever you want. Note: I have encountered a problem in this step. The Page Element page was cropped. What I did is just close the window login back to my blogger account.

View your blog and you will now have an Email Subscription box like the one I have in this blog. Note that if a user subscribes to your blog, they will receive emails if you have updates. No Updates, no Email to your subscribers.


Wednesday, February 4, 2009

How to put or embed Google Maps in your Post

Sponsored Links

Step by step instruction on how to put or embed Google Maps in your Post

1. Go to maps.google.com

2. Type the location, where you want to display on your post, on the Search Bar.

3. In my example I typed "Munich English Garden". "One of the world's largest urban public parks, larger than New York's Central Park but smaller than London's Richmond Park" - Wikipedia.

Sometimes the location which you are searching for yields multiple results. So narrow down the location by simply clicking one of the links to get the accurate map.


4. Once You have pinpoint the location, click on Link found on the upper right side of the window.


5. Click on Customize and preview embedded map so that you can resize the dimension of the map to better fit in your page.


6. Copy the code provided.

7. Login to your Blogger account.

8. Click on NEW POST.

9. Click Edit Html.

10. Paste the Google Maps code.

11. Click PUBLISH NOW. If you wish to Publish your post later, you have the option to click SAVE NOW.

Here is an Example of this tutorial:


View Larger Map

Tuesday, February 3, 2009

How to Disable Right Click in your Blog

Sponsored Links

Some of the website owners or publishers are very protective with their articles or posts. What I mean is that they don't want visitors to be able to copy and paste their articles due to legal or copyright reasons. If you are on of them, this tutorial will help you. It disables the mouse right click function on your blog or site.

Step by step tutorial on how to Disable Right Click on your Blogger.

1. Login to your Blogger account.

2. Click on Layout

3. Click on the Add a Gadget link.

4. Select HTML/JavaScript widget.
5. Paste the code below in the Content box.

<script language="JavaScript"> <!-- var message="Right-Click Disabled!"; /////////////////////////////////// function clickIE4() { if (event.button==2) { alert(message); return false; } } function clickNS4(e) { if (document.layers||document.getElementById&&!document.all) { if (e.which==2||e.which==3) { alert(message); return false; } } } if (document.layers) { document.captureEvents(Event.MOUSEDOWN); document.onmousedown=clickNS4; } else if (document.all&&!document.getElementById) { document.onmousedown=clickIE4; } document.oncontextmenu=new Function("alert(message);return false") // --> </script>

6. Click on Save.

View your blog and try to press Right Click.

How to put or install Google Analytics Code in your blog or site

Sponsored Links

After you created your blog, I would strongly suggest that you put a tracker code on your blog. This is very important because you can keep track with the visitors on your site. Information that you can keep track are number of pageviews, number of visits, location of the visitor, average time on site, unique visitors etcetera. If you use Blogger then I would STRONGLY suggest to use Google Analytics as it is very easy to install, very easy to use and absolutely FREE!

Step by step tutorial on how to put or install Google Analytics Code in your blog or site.

1. Login to your Blogger account.

2. Backup you Template.

3. Open Google Analytics page.

4. Click on Add Website Profile.

5. Select Add a Profile for a new domain.


6. Enter you blog URL with out the "http://".
For example: bloggertinker.blogspot.com/

7. Click Finish.


8. Copy the tracking code provided.
The code should look something like this:


<script type="text/javascript"> var gaJsHost = (("https:" == document.location.protocol) ? "https://ssl." : "http://www."); document.write(unescape("%3Cscript src='" + gaJsHost + "google-analytics.com/ga.js' type='text/javascript'%3E%3C/script%3E")); </script> <script type="text/javascript"> try { var
pageTracker = _gat._getTracker("UA-6824234-3"); pageTracker._trackPageview(); } catch(err) {}</script>

9. Go back to your blog Layout Page.


10. Click on Expand Widget Templates.

11. Locate </body>.

12. Just before this code, paste the tracking code provided by Google Analytics.

13. Click SAVE TEMPLATE.


If you go to your Analytics page, your Website profile will have a warning icon. It means that Google is still processing your request. Just wait for a couple of minutes and your status will be Check.

Now you can already keep track of you visitors.

Monday, February 2, 2009

How to put Google Adsense within (inline) your Post Content

Sponsored Links

First of all, read this article first so that you will know why "Ads shouldn't be placed under a title or section heading in a way that implies that the ads are not ads".

But this is allowed IF you put "sponsored links" or "advertisements" just below the post title (which means Post Title - Advertisements - Google Adsense). Just like what I did on this blog. Note only the text "sponsored links" or "advertisements" are allowed.


Step by step tutorial on how to put Google Adsense within (inline) your Post Content.

1. Login to your Blogger account.

2. Backup you Template.

3. Check the Expand Widget Templates checkbox.

4. Locate the code <data:post.body/>.

5. Just before this code paste your Google Adsense code. (Parse your Adsense code first before you paste it as your are pasting it directly on your XML code not within a HTML/JavaScript widget. You can parse your Google Adsense code here.)

6. Put your Adsense Code between div tags:
<div style='float:right; margin-left:10px;'>
</div>

If you want your Adsense to be displayed on the right side of your post, just change the float value to right.

So your code should look something like this:
<div style='float:right; margin-left:10px;'>
YOUR PARSED ADSENSE CODE
</div>

If you want your Adsense to be displayed on the left side of your post, just change the float value to left.

So your code should look something like this:
<div style='float:left; margin-right:10px;'>
YOUR PARSED ADSENSE CODE
</div>

7. Click SAVE TEMPLATE.

View your blog and it will now have an Adsense within your Post. But PLEASE DON'T FORGET to put the text "sponsored links" or "advertisements" just like what I did.

How to put Google Adsense below Post Title

Sponsored Links

First of all, read this article first so that you will know why "Ads shouldn't be placed under a title or section heading in a way that implies that the ads are not ads".

But this is allowed IF you put "sponsored links" or "advertisements" just below the post title (which means Post Title - Advertisements - Google Adsense). Just like what I did on this blog. Note only the text "sponsored links" or "advertisements" are allowed.

Step by step tutorial on how to put Google Adsense below Post Title.

1. Login to your Blogger account.

2. Backup you Template.

3. Check the Expand Widget Templates checkbox.

4. Locate the code <data:post.body/>.

5. Just before this code paste your Google Adsense code. (Parse your Adsense code first before you paste it as your are pasting it directly on your XML code not within a HTML/JavaScript widget. You can parse your Google Adsense code here.)

6. Click SAVE TEMPLATE.

View your blog and it will now have an Adsense Below your Post Title just like mine. But PLEASE DON'T FORGET to put the text "sponsored links" or "advertisements" just like what I did.


How to put Google Adsense below Header

Sponsored Links

Step by step tutorial on how to put Google Adsense below Header.

1. Login to your Blogger account.

2. Backup you Template.

3. Check the Expand Widget Templates checkbox.

4. Locate the code <div id='header-wrapper'>. The code should look something like this:
<div id='header-wrapper'>
<b:section class='header' id='header' maxwidgets='2' preferred='yes' showaddelement='yes'>
<b:widget id='Header1' locked='false
' title='Blogger Tinker (Header)' type='Header'>
<b:includable id='title'>


5. Click SAVE TEMPLATE.

6. Click on Page Elements Tab and you will see that the Header Section already has a Add a Gadget link.

7. Click on the Add a Gadget link.

8. Select HTML/JavaScript widget.
9. Paste your Adsense Code in the Content box.

10. Click on Save.

11. By default the arrangement of your Header Section will be Adsense and then below it is your Header.

12. Just Drag the header above your HTML/JavaScript widget.
13. Click SAVE.

See your blog and it will now have an Adsense below your header title.


How to put a DIGG widget or button on every post

Sponsored Links

Step by step tutorial on how to put a DIGG widget or button on every post.

This step by step tutorial will tell how to put a DIGG widget or button on every post. Just like what I did on this blog (see DIGG button on the right side).

1. Login to your Blogger account.

2. Backup you Template.

3. Check the Expand Widget Templates checkbox.

4. Locate the code <p><data:post.body/></p>.

5. Just before the code above, copy and paste the code below.
<div style='float:right; margin-left:10px;'>
<script type='text/javascript'>
digg_url=&quot;<data:post.url/>&quot;;
</script>
<script src='http://digg.com/tools/diggthis.js' type='text/javascript'/>
</div>

6. Click SAVE TEMPLATE and view your blog.

How to backup Blogger Template

Sponsored Links

Step by step tutorial on how to backup Blogger Template.

1. Login to your Blogger account.

2. Click on Layout.

3. Click on Edit HTML.

4. Click on Download Template.

You're done!
Note that it would be easier if your filename is understandable. For example if you have a personal blog with a 2 column layout and a blue sky theme, it would be best to name the file as "PersonalBlog-2Column-BlueSky.xml"

If you have changed your blog layout but you don't like it, it is very easy to change back to your original template just by remembering the keywords "Personal Blog 2 Column Blue Sky".

Google Blogger for Dummies Book

Sponsored Links

The Dummies series books are very popular nowadays because it tackles a certain topic in a way that everyone could understand. If you want to blog or have already a blog, this Dummies Book will very helpful in developing your blog. This is specifically for Google's blog platform called Google Blogger.

The author of the book is Susan Gunelius and is priced at $16.49.

Google Blogger for Dummies will cover the basics of using Blogger from creating a blog to setting up a blog. It also covers advanced techniques which are very helpful and useful to experienced bloggers.

From the Back Cover

Here's what you need to know to get started with Google Blogger

Want to share your opinions, promote your business, network with others, and maybe pick up a few extra dollars, all without learning to program? Millions of people are doing it with Google Blogger, and you can too. This book helps you create a Blogger account, write compelling content, build an audience, make money from your blog, and more!

  • What's a blog, and what's Blogger? — learn the parts of a blog, what Blogger does, and how to choose goals and blog topics

  • Nuts and bolts — choose a domain name, learn to use the dashboard, pick a template, and configure settings

  • Blog effectively — learn blogosphere etiquette and some secrets for long-term success

  • Fun bells and whistles — dress up your blog with templates (lots of them are free!)

  • Does making dollars make sense? — explore options for Google Adsense®, contextual and text link ads, paid posts, and merchandising with CafePress

  • Spread the word — promote your blog through search engines and social networking sites

  • A family of blogs — set up multi-user blogs or branch into mobile blogging, podcasting, or video blogging

  • Get more Google — use Picasa®, YouTube, Feedburner, and more

Open the book and find:

  • How to choose a blog topic and personalize your blog

  • What you should know about moderating comments

  • How to maintain your blog with tools like Blog This! and Quick Edit

  • Simple search engine optimization techniques

  • Tips for tracking your blog traffic

  • Where to find cool free templates

  • How to make money from your blog

  • Ten useful social networking sites

In my humble opinion, I believe that this book is great for beginners. I mean even beginners who have no idea what blogging is. I have read several Dummies books and all I can say is that it is very easy to understand as it explains in a very detailed way and give instructions step by step. Grab a copy now and you might be the next Millionaire Blogger. ^_^


Please subscribe to my rssfeed 16x16 button Subscribe to my RSS Feed or email subscription 16x16 button Subscribe via Email if you want to receive updates. Thanks! ^_^