Custom Search
Showing posts with label Google Adsense. Show all posts

Wednesday, March 4, 2009

Adsense now in Euros

Sponsored Links

Today, I have just received an email from Google Adsense Team that publishers located in France, Germany, Italy, the Netherlands, and Spain can now view AdSense reports in Euros.

To make the switch to local currency reports, you'll need to agree to a new set of Terms and Conditions. Here are the main changes involved:
  • The party that publishers are contracting with changes from Google Inc. to Google Ireland Limited.
  • Publishers are responsible for paying any local taxes in their jurisdiction. Google will only issue VAT refunds to publishers with an address in Ireland.
  • The governing law changes from California law to either English or local law.
Unfortunately, we're not able to interpret the meaning of changes in our legal documents for publishers -- if you have questions or need legal advice on interpreting the new Terms, please don't hesitate to contact an attorney.

We encourage you to update your account to local currency reports soon, as we may require this change in the future. If we're able to offer this to publishers in other countries, we'll provide details here on Inside AdSense. For more information, please feel free to visit our Help Center. - Inside Adsense Team
This is a good new for me (I live in Germany). The risk of currency fluctuation between US dollars and Euros can now be avoided. But the bad news is how much tax should I pay (as German Taxation is very high -_- ).

Saturday, February 28, 2009

How to setup/put/install Google Adsense for Search

Sponsored Links


What is Adsense for Search?

AdSense for search is a free solution that allows publishers to place a search box on their site and earn revenue from relevant ads on the search results page.

AdSense for search offers you the following:

  • choosing the content your users search: your site, a collection of sites you choose, or the entire web. You can also prioritize and restrict search to specific sections of sites.
  • customization of look and feel - you choose the colors, location of the ads, and the option to host the results on your site or have Google host them for you.
  • monetization of search results pages with targeted ads.
- Google Adsense

This is a step by step tutorial on how to setup/put/install Google Adsense for Search.

1. Login to your Google Adsense Account.

2. Click on Adsense Setup tab.

3. Click on Adsense for Search.

4. In the Search Type field, you have the option to select either Only sites I select or The entire web. It would be best that you choose Only sites I select considering that you don't want your visitors to leave your site.

5. In the Selected sites field, enter your blog or web URL, in my case I entered http://bloggertinker.blogspot.com

6. In the Optional Keywords, type the keywords that you want to use to tune your search engine result.
Example:
If your topic is about blogging tips, you enter the keywords: blogging, blog, blog tips, blog tutorials, adsense. Separate you keywords with a comma "," .

7. In the Site language field, select the primary language of your website.

8. In the Your site encoding field, I just leave the default value, which is West European Latin-1 (ISO-8859-1)

9. In the Country or territory for Google domain field, I just leave it as United States.

10. In the Custom channel field, I would suggest that you check Automatically create a new channel, if you have no idea what Channels are. I will make a detailed explanation on this in my future post but if you are curios about Channels consult Google's Channel Guide here.

11. Click Continue>>.

12. In this page, select the Look and Feel and the Text Box Length of your Search Box. See the Sample on this page so that you will know how your Search Box would look.

13. Click Continue>>.

14. In the Opening of search results page field, I suggest that you select Open results on Google in a new window. This way you don't have to worry about your layout getting messed up because of the search results. But of course it is up to you if you want to choose other options.
You also have the option to put a Logo on you search result window by providing the image URL in the Logo image URL field.

15. Click Continue>>.

16. Check the "Your use of these AdSense for Search features is subject to additional terms..."

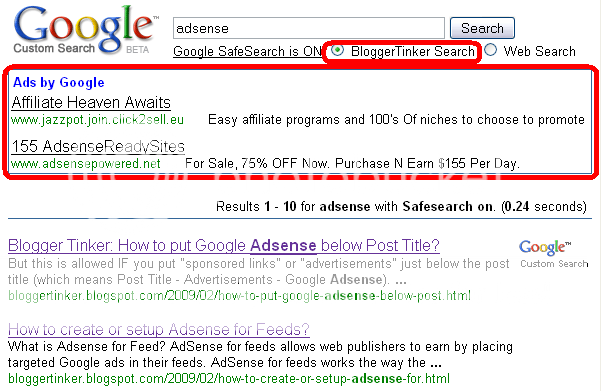
17. Name Your Search Engine if you want to, in my case I named it BloggerTinker Search. Try using my Search and you will see my search engine name at the top.

18. Click on Submit and Get Code. Copy the code.

19. Login to you Blogger account.

20. Click on Layout.

21. Adding the Adsense Search is just like adding your favorite widgets. Click on Add a Gadget and select HTML/JavaScript. Paste the Adsense for Search code and click on Save. Positon your Adsense Search on the location that you want.22. View your blog.

The tutorial is a bit long right? Well, step by step tutorial is better than a tutorial that only talks on the most important parts. This way, beginners will also be guided in the correct direction. Test Your Adsense Search on you should see ads on your search result window, something like the below the title of these post or click HERE for a search test on this site.

Friday, February 20, 2009

How to change the font face/type/family of Google Adsense Text Ads

Sponsored Links

Today, I have just received an email from Inside Adsense that we can now control or change the font type or style of our Text Ads. We can choose between Arial, Times, and Verdana font faces. The options are limited but this is much better than no control over it.

This is a step by step tutorial on how to change the font face/type/family of Google Adsense Text Ads.

1. Login to your Google Adsense account

2. Click on the Adsense Setup Tab

3. Click on Manage Ads

4. Choose an Ad unit that you would like to customize

5. Scroll down and now you will see a new "Fonts" option. Select the Font Family that you want. There are only 3 choices: Arial, Times and Verdana. As I have said, this is much better than no control, right?
6. Click on Save settings. "Your AdSense unit has been saved. Changes may not appear for up to 10 minutes." Done!

I have just noticed that the options Account default, Standard Adsense font family and Verdana are of the same values. This means that the default font face for Google adsense before this new feature is Verdana. So to those blogs or sites who used Verdana as their font, I guess you don't need to change your Text Ads font. But of course its up to you.hehe Note that this feature is not applicable to LINK UNITS.

You can set a custom font as the account default, to show in all your AdSense for content units. You can also choose custom settings on individual ad units. We currently offer the font faces Arial, Times, and Verdana, which have shown to perform well across publisher sites. - Google

I have not tried this one yet since I am using different templates on my different blogs. The customization or changing of the font really depends on what font you used in your text so that you can better blend the ads and your text. So to those who participated in the Google Adsense program, I encourage you to try this. This might just be a little thing to you but I believe most Adsense users, who wants to better optimize their Google Text Ads, are happy with this new feature.

Monday, February 16, 2009

How to create or setup Adsense for Feeds

Sponsored Links

What is Adsense for Feed? AdSense for feeds allows web publishers to earn by placing targeted Google ads in their feeds. AdSense for feeds works the way the rest of the AdSense program works: by delivering ads that are relevant to your content and your readers.

Like other AdSense ads, feed ads can be paid in two ways: by click, or by impression. Feed ads can also be targeted in two ways.

  • contextually targeted to the content in your feed
  • targeted by advertisers to your specific feed when you set up an ad placement

You can control the frequency, appearance, and positioning of Google ads in your feeds. The ad size is automatically determined based on where your feed is appearing. - Google Adsense

Step by step tutorial on how to create or setup Adsense for Feeds.

1. Login to your Google Adsense account.

2. Click on Adsense Setup Tab.

3. Click on Adsense for Feeds.

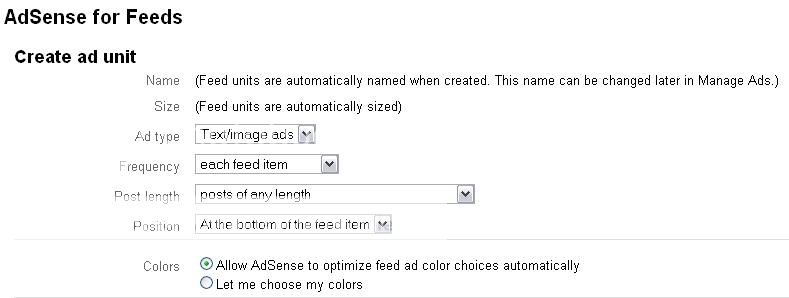
4. In this step, you have the option to change the setting of your Adsense for Feed unit. But I usually leave its default settings because I don't have any problems with it.

If you are using FeedBurner to burn your feeds, your blog will be displayed below. In this example, it stated that "Your only remaining feed without an ad unit, , will display this ad unit."

5. Click on Save and you are done!

6. The next time you publish an article, your Feed Subscribers will see a Google Ad below your post. Below is a sample screen shot of my Tech Blog feed, TechMata, with Google Adsense for Feed. My Asus Eee PC 1000 Review to be specific.


Please note that you can also consult the official Google Adsense page regarding this tutorial.


Wednesday, February 11, 2009

How to put Google Ads below Post Content but above Comments

Sponsored Links

Step by step instruction on how to put below Post Content but above Comments.

1. Login to your Blogger account.

2. Backup you Template.

3. Check the Expand Widget Templates checkbox.

4. Locate the code below:
<div class='post-footer-line post-footer-line-3'> <span class='post-location'> <b:if cond='data:top.showLocation'> <b:if cond='data:post.location'> <data:postLocationLabel/>

5. Just before this code paste your Google Adsense code. (Parse your Adsense code first before you paste it as your are pasting it directly on your XML code not within a HTML/JavaScript widget. You can parse your Google Adsense code here.)

Example of a Parsed Google Adsense Code:
<!-- Start Code Google Ads-->
<br/>
&lt;script type=&quot;text/javascript&quot;&gt;&lt;!-- google_ad_client = &quot;pub-7052701651002780&quot;; google_ad_host = &quot;pub-1599271086004685&quot;; /* BT BelowComments 336x280 TextAd */ google_ad_slot = &quot;9693535680&quot;; google_ad_width = 336; google_ad_height = 280; //--&gt; &lt;/script&gt; &lt;script src=&quot;http://pagead2.googlesyndication.com/pagead/show_ads.js&quot; type=&quot;text/javascript&quot;&gt; &lt;/script&gt;
<!-- End Code Google Ads-->

I would suggest that you put a comment like the one above so that it will be easier for you to debug later if you want to make changes. The code that you will put here should be parsed.

6. Click SAVE TEMPLATE and view your blog.

Monday, February 2, 2009

How to put Google Adsense within (inline) your Post Content

Sponsored Links

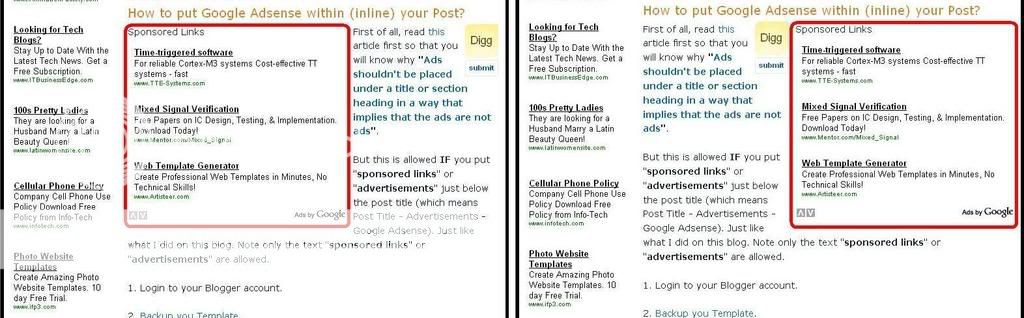
First of all, read this article first so that you will know why "Ads shouldn't be placed under a title or section heading in a way that implies that the ads are not ads".

But this is allowed IF you put "sponsored links" or "advertisements" just below the post title (which means Post Title - Advertisements - Google Adsense). Just like what I did on this blog. Note only the text "sponsored links" or "advertisements" are allowed.


Step by step tutorial on how to put Google Adsense within (inline) your Post Content.

1. Login to your Blogger account.

2. Backup you Template.

3. Check the Expand Widget Templates checkbox.

4. Locate the code <data:post.body/>.

5. Just before this code paste your Google Adsense code. (Parse your Adsense code first before you paste it as your are pasting it directly on your XML code not within a HTML/JavaScript widget. You can parse your Google Adsense code here.)

6. Put your Adsense Code between div tags:
<div style='float:right; margin-left:10px;'>
</div>

If you want your Adsense to be displayed on the right side of your post, just change the float value to right.

So your code should look something like this:
<div style='float:right; margin-left:10px;'>
YOUR PARSED ADSENSE CODE
</div>

If you want your Adsense to be displayed on the left side of your post, just change the float value to left.

So your code should look something like this:
<div style='float:left; margin-right:10px;'>
YOUR PARSED ADSENSE CODE
</div>

7. Click SAVE TEMPLATE.

View your blog and it will now have an Adsense within your Post. But PLEASE DON'T FORGET to put the text "sponsored links" or "advertisements" just like what I did.

How to put Google Adsense below Post Title

Sponsored Links

First of all, read this article first so that you will know why "Ads shouldn't be placed under a title or section heading in a way that implies that the ads are not ads".

But this is allowed IF you put "sponsored links" or "advertisements" just below the post title (which means Post Title - Advertisements - Google Adsense). Just like what I did on this blog. Note only the text "sponsored links" or "advertisements" are allowed.

Step by step tutorial on how to put Google Adsense below Post Title.

1. Login to your Blogger account.

2. Backup you Template.

3. Check the Expand Widget Templates checkbox.

4. Locate the code <data:post.body/>.

5. Just before this code paste your Google Adsense code. (Parse your Adsense code first before you paste it as your are pasting it directly on your XML code not within a HTML/JavaScript widget. You can parse your Google Adsense code here.)

6. Click SAVE TEMPLATE.

View your blog and it will now have an Adsense Below your Post Title just like mine. But PLEASE DON'T FORGET to put the text "sponsored links" or "advertisements" just like what I did.


How to put Google Adsense below Header

Sponsored Links

Step by step tutorial on how to put Google Adsense below Header.

1. Login to your Blogger account.

2. Backup you Template.

3. Check the Expand Widget Templates checkbox.

4. Locate the code <div id='header-wrapper'>. The code should look something like this:
<div id='header-wrapper'>
<b:section class='header' id='header' maxwidgets='2' preferred='yes' showaddelement='yes'>
<b:widget id='Header1' locked='false
' title='Blogger Tinker (Header)' type='Header'>
<b:includable id='title'>


5. Click SAVE TEMPLATE.

6. Click on Page Elements Tab and you will see that the Header Section already has a Add a Gadget link.

7. Click on the Add a Gadget link.

8. Select HTML/JavaScript widget.
9. Paste your Adsense Code in the Content box.

10. Click on Save.

11. By default the arrangement of your Header Section will be Adsense and then below it is your Header.

12. Just Drag the header above your HTML/JavaScript widget.
13. Click SAVE.

See your blog and it will now have an Adsense below your header title.


Please subscribe to my rssfeed 16x16 button Subscribe to my RSS Feed or email subscription 16x16 button Subscribe via Email if you want to receive updates. Thanks! ^_^