Custom Search

Tuesday, March 17, 2009

How to put Navigation Tabs in Blogger using CSS Tab Designer

Sponsored Links

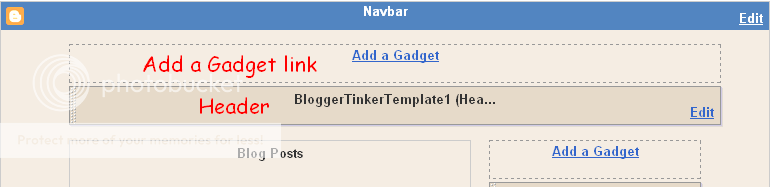
In this tutorial I will be guiding you on how to put Navigation Tabs in your blog using CSS Tab Designer (look at my navigational tabs at the top of this blog layout). Don't worry about the technical stuff because this is just very easy. All you have to do is just COPY and PASTE codes! But before we can add our Navigational Tabs, I suggest that you read and perform my tutorial on how to put/add an additional widget/gadget (Add a Gadget link) in your Blogger Header.

This is a step by step tutorial on how to put Navigation Tabs in your blog using CSS Tab Designer.

1. Download the CSS Tab Designer installer HERE or visit their website at http://www.highdots.com/css-tab-designer/ . CSS Tab Designer is FREE!

2. Unzip the file and install the program.

3. Launch the CSS Tab Designer Program

4. File -> Open samples... Double click on "Tab Menu 8.txt". Your window should look like the one below.

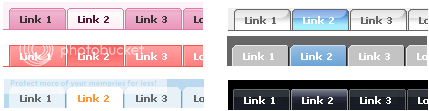
You can choose any of the designs on the Tab Styles column but to make this tutorial simpler lets stick with the Tab Menu 8 (the Pink Navigational Tab Bar). Anyway, you can still use any of these designs using this tutorial.

Note: The links on the Preview pane are DEAD LINKS, so navigate the tabs using the links on the Items Pane.

5. Go to C:\Program Files\CSS Tab Designer 2\styles\Tab Menu 8. Upload the files tableft8.gif and tabright8.gif to your Picasa or Photobucket or any image file hosting that you used. After uploading the image files, copy the FILE LINK (direct link) of your files to Notepad or any text editor. Example:

https://blogger.googleusercontent.com/img/b/R29vZ2xl/AVvXsEjJd7fRnGP_3Mj7eZqPCMXZAgFg15ooYGtmprgdRd7y_OC7msTS7qLQ27CdrGdJmn5dQ3i-MiIgCHw5aIexyzmkH0MKNUEeFjvHD5KnSQFYEHtHIuUnn0OXzr298WkM1G8pt6GddzhK2jfx/s144/tableft8.gif

https://blogger.googleusercontent.com/img/b/R29vZ2xl/AVvXsEgoM3JlNdJG4bnnf2A-btjhQViRVLPlSRHXvEo4HUqBeEoLdRgact_LATTKFQcSzazxHFcOxo4KN9CjdSy3CiyflfqtbqMPkHS0Am1j9sWFT3OL4HPOmuix3jHxkDik9riB1FMyc4k9-AK-/s144/tabright8.gif

6. Go back to CSS Tab Designer, click on the Code tab and copy the code that looks something like this:
Click Image to ENLARGE.

7. Login to your Blogger account.

8. Backup you Template. PLEASE DO THIS!

9. Go to Layout-> Edit HTML.

10. Locate the code </b:skin>. Just before this code, paste the code that we copied from step #6

11. Locate the code background:url("tableft8.gif") and background:url("tabright8.gif"). Replace them with the FILE LINKS that we copied from step #5. It should look like

background:url("https://blogger.googleusercontent.com/img/b/R29vZ2xl/AVvXsEjJd7fRnGP_3Mj7eZqPCMXZAgFg15ooYGtmprgdRd7y_OC7msTS7qLQ27CdrGdJmn5dQ3i-MiIgCHw5aIexyzmkH0MKNUEeFjvHD5KnSQFYEHtHIuUnn0OXzr298WkM1G8pt6GddzhK2jfx/s144/tableft8.gif") no-repeat left top;

background:url("https://blogger.googleusercontent.com/img/b/R29vZ2xl/AVvXsEgoM3JlNdJG4bnnf2A-btjhQViRVLPlSRHXvEo4HUqBeEoLdRgact_LATTKFQcSzazxHFcOxo4KN9CjdSy3CiyflfqtbqMPkHS0Am1j9sWFT3OL4HPOmuix3jHxkDik9riB1FMyc4k9-AK-/s144/tabright8.gif") no-repeat right top;

12. Click on SAVE TEMPLATE.

13. Lets now add a Home and an About Me Navigational Tabs. Click on Add a Gadget -> HTML/JavaScript link in your Header and paste the code below

<div id="tabs8" style="float:left;"> <ul> <li><a href="http://YOURBLOG.blogspot.com/"><span>Home</span></a></li> <li><a href="http://YOURABOUTMELINK"><span>About Me</span></a></li> </ul> </div>

If you want to add more navigational links then just add the code

<li><a href="http://YOUROTHERLINKS"><span>About Me</span></a></li>

14. Click on SAVE. Rearrange your Navigation the way you want whether you want it to display on top or below your Header.

15. View your blog. You will now have a Home and About Me navigational links in your blog. Look at the header of my blog as a WORKING EXAMPLE.

If you have any questions, please don't hesitate to ask or drop a comment below. Happy Tweaking!

Thursday, March 12, 2009

How to put additional widgets/gadgets in your Header in Blogger

Sponsored Links

In this tutorial, I will guide you on how to put/add an Add a Gadget link in your Blogger Header. Or the other way to say this is how to put/add additional widgets/gadgets in your Blogger Header.

This is a step by step tutorial on how to put additional widgets/gadgets in your Header in Blogger.

1. Login to your Blogger account.

2. Backup you Template.

Assuming you are using the given default Blogger Templates (non-customized Blogger Template), your Layout should look like the one below. Your Header does not have an Add A Gadget link.


3. Go to Layout -> Edit HTML.

Locate the code

<b:section class='header' id='header' maxwidgets='1' showaddelement='no'>

and replace it with

<b:section class='header' id='header' maxwidgets='4' showaddelement='yes'>

Explanation:
- We set the maxwidgets from 1 to 4 (actually as many widgets as you want) so that we can add additional widgets in to our Header
- We changed the value of showaddelement from no to yes so that we can now have the Add A Gadget link (obviously so that we can add additional widgets).

After performing the step above, your layout should now look like this


4. Locate the code
<b:widget id='Header1' locked='true' title='YourBLOGNAME (Header)' type='Header'/>

and replace it with

<b:widget id='Header1' locked='false' title='YourBLOGNAME (Header)' type='Header'/>

Explaination:
- We changed the value of locked from true to false so that we could rearrange our Header widgets the way we want (place widgets above or below the Header). Example the arrange would be

Widget1
Header
Widget2

or

Header
Widget1
Widget2

If we leave the locked value to true, the additional widgets can only be placed on top of the Header. So the only arrangement would be

Widget
Widget
Widget
Header

5. Click SAVE TEMPLATE and go back to Layout (Page Elements). Notice that we already have an Add a Gadget link in our header. Now you can already add a widget or gadget in your Blogger Header, below and/or above your Header Widget. Enjoy!


In my next post I will teach on how to put/add Navigational Tab Links in your Header like the one on my blog or any of the designs below:


If you have any questions, please don't hesitate to ask or comment below ^_^.

Wednesday, March 11, 2009

Top 10 Best-Clean-Professional-Looking Blogger Templates

Sponsored Links

The reasons why I choose these templates as "Best, Clean, and Professional" are:
  • Clean and Simple layouts
  • Clean and Simple Template
  • Professional design
  • Colors and Fonts are easy to change/customize
  • Flexible number of sidebars
  • Easy Navigation
  • Header Image can be changed easily
  • Runs smoothly in all popular web browsers
And so here it is, the Top 10 Best-Clean-Professional-Looking Blogger Templates that I have gathered from the web.

1. Ads Theme Blogger
Colors: Black, White, Gray


2. i Theme Blogger
Colors: Blue, White, Gray


3. The Professional Template
Colors: Black, White

No Live Demo | Download

4. Writer's Blog
Colors: White, Blue

No Live Demo | Download


5. Wild Birds
Colors: White, Dark Orange, Black

No Live Demo | Download


6. Daily Inspired
Colors: White, Gray


No Live Demo | Download


7. Arthemia Magazine
Colors: Black, White


8. Professional Magazine Style
Colors: Black, White

9. Pepper
Colors:Black White Gray


10. Elegance
Colors: Black, White, Gray


Blogger Template Sources:
http://www.eblogtemplates.com/
http://themelib.com/
http://bloggertricks.com/
http://btemplates.com/
http://woork.blogspot.com/
http://btemplates.com/

Monday, March 9, 2009

How to put Recent Posts/Recent Articles widget in Blogger

Sponsored Links

This is the simplest and easiest way to add a Recent Posts/Recent Articles widget in your blog. Unlike other blogs, the tutorial here uses the standard Blogger Feed widget to make the Recent Posts/Recent Articles widget. And I am 100% sure your Recent Posts/Recent Articles widget will work.
Step by step tutorial on how to put Recent Posts widget in Blogger

1. Login to your Blogger account.

2. Click on Layout.

3. Click on Add a Gadget.

4. Choose Feed.
5. Paste your Feed URL.
Example feed URLs are:
http://feedproxy.google.com/bloggertinker
http://bloggertinker.blogspot.com/feeds/posts/default

If you don't know where to get the feed URL of your blog, the easiest way to do that is to locate the text Subscribe to: Posts (Atom), just located after every post on your blog.

If you are using firefox, write click on the Posts (Atom) link and then click Copy Link Location.
If you are using Internet Explorer, write click on the Posts (Atom) link and then click Copy Shortcut.

6. Click on CONTINUE.

7. This page displays a preview of your Recent Posts Widget. The default title of your widget is the name of your blog, just change it to "Recent Posts" or whatever title you like. You can change the number of recent posts/recent articles/items to be shown. You also have the option to display the item dates (dates of your recent posts), and item sources/authors (author/s of your recent posts).8. Click on SAVE.

9. View your blog and I am 100% sure your Recent Posts/Recent Articles widget will show up!

If you are wondering why I did not use a Recent Post widget on my blog, please take a look of my Archive-Popular-Categories-Traffic tabbed navigation widget on my sidebar (right side). As you can see my default display for the widget is my blog Archive, if I am going to put a Recent Posts widget then it will be redundant (for me). But it is really up to you if you want to put this widget.

Other related post from the net:
http://beautifulbeta.blogspot.com/2006/11/customizable-recent-posts-widget.html
http://themelib.com/2008/07/recent-posts-and-recent-comments-widgets-for-blogger/
http://www.eblogtemplates.com/setup-recent-posts-recent-comments/
http://www.bloggerbuster.com/2008/07/recent-posts-widget-for-blogger.html

Wednesday, March 4, 2009

Adsense now in Euros

Sponsored Links

Today, I have just received an email from Google Adsense Team that publishers located in France, Germany, Italy, the Netherlands, and Spain can now view AdSense reports in Euros.

To make the switch to local currency reports, you'll need to agree to a new set of Terms and Conditions. Here are the main changes involved:
  • The party that publishers are contracting with changes from Google Inc. to Google Ireland Limited.
  • Publishers are responsible for paying any local taxes in their jurisdiction. Google will only issue VAT refunds to publishers with an address in Ireland.
  • The governing law changes from California law to either English or local law.
Unfortunately, we're not able to interpret the meaning of changes in our legal documents for publishers -- if you have questions or need legal advice on interpreting the new Terms, please don't hesitate to contact an attorney.

We encourage you to update your account to local currency reports soon, as we may require this change in the future. If we're able to offer this to publishers in other countries, we'll provide details here on Inside AdSense. For more information, please feel free to visit our Help Center. - Inside Adsense Team
This is a good new for me (I live in Germany). The risk of currency fluctuation between US dollars and Euros can now be avoided. But the bad news is how much tax should I pay (as German Taxation is very high -_- ).

Please subscribe to my rssfeed 16x16 button Subscribe to my RSS Feed or email subscription 16x16 button Subscribe via Email if you want to receive updates. Thanks! ^_^